
Main Sequence Tech Tree: Every Tier and What It Gates
A complete Main Sequence tech tree reference by tier, with science costs, the Slipstream and interstellar gates, and which nodes are worth rushing first.
The Main Sequence tech tree is a directed graph, not a linear campaign. Tiers unlock tiers, individual nodes unlock machines, and a few nodes are hard gates that stop an entire branch until you pay. Knowing which nodes are gates saves hours of building the wrong factory.
This reference lists the demo's visible tree by tier. Costs are the demo build 26097974 values. The launch build may add nodes or change prices; the structure and the named gates are the useful part.
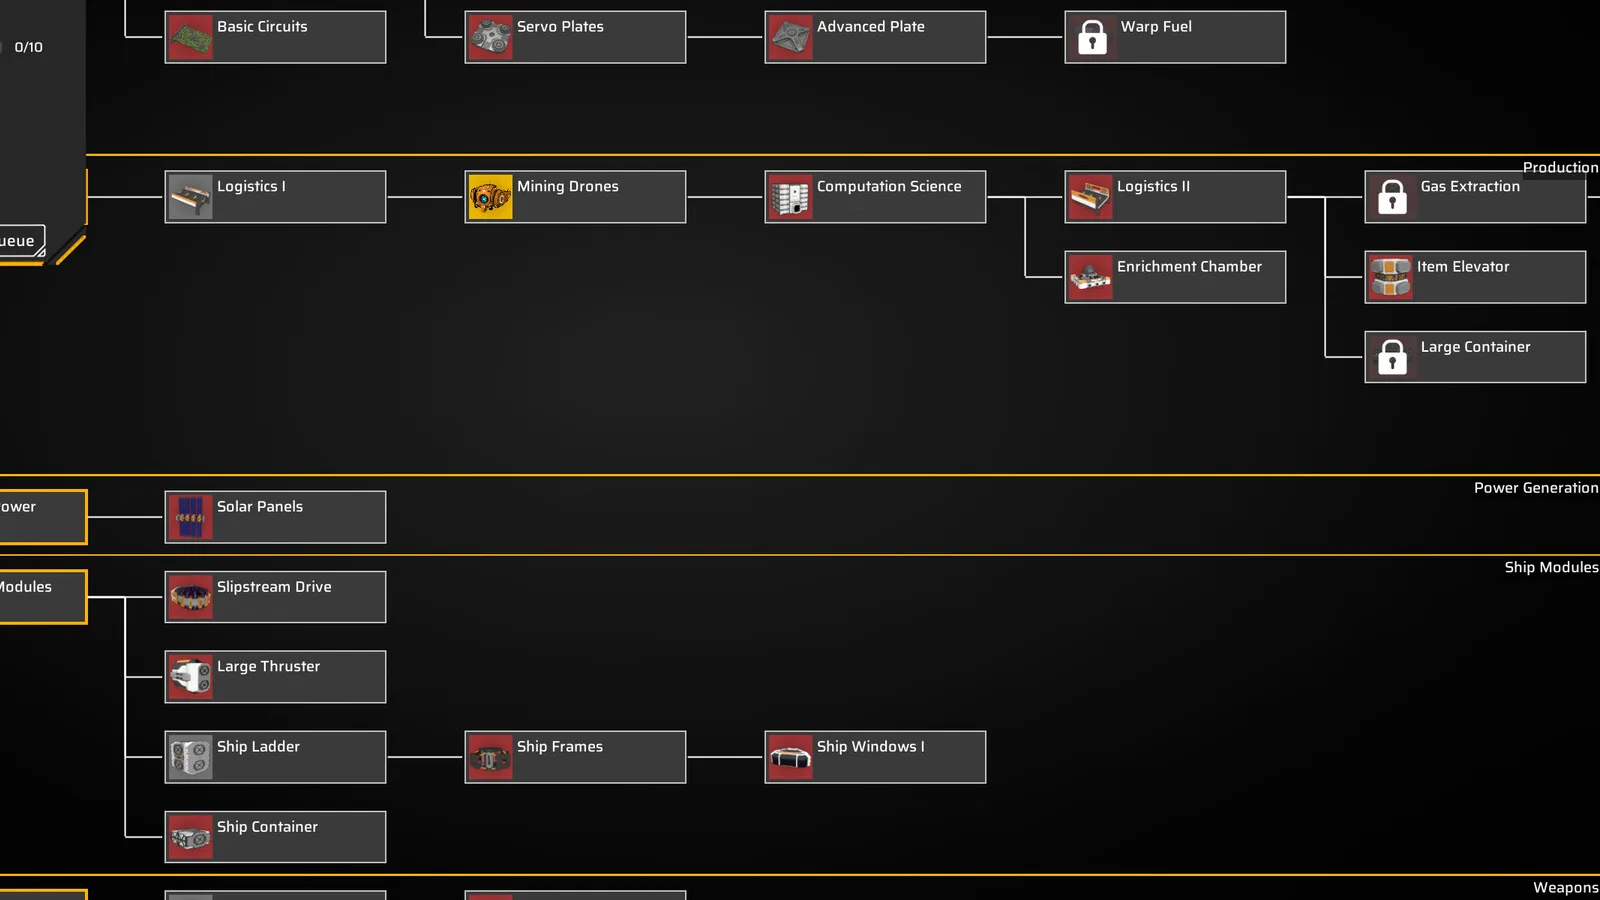
Tier 2 ends at Slipstream; tier 4 is the interstellar gate, and each tier costs four figures of science.
How to read the costs
Costs are written as amount × number of science types. For example, Quantum Science at 200 × 3 means 200 Material, 200 Computation, and 200 Electromagnetic. A single-type cost like 50 Material is just that.
The tree shows locked nodes greyed out with a padlock. A locked node is not necessarily unreachable; it may require a prerequisite, a higher tier, or a relic technology. Hover the node to see the requirement.
Tier 0: free foundations
These cost nothing and should all be unlocked in the first hour:
- Basic Crafting
- Basic Production
- Basic Refining
- Basic Ship Modules
- Basic Ship Weapons
- Basic Station Modules
- Hydrogen Power
Tier 0 is the grammar of the game. Basic Refining enables plates, Basic Production enables assemblers, Basic Station Modules enables rooms and corridors, and Hydrogen Power enables the reactor. Do not skip any of them.
Tier 1: the cheap gates
| Technology | Cost | Unlocks |
|---|---|---|
| Logistics I | 5 Material | Conveyor Belt Mk.1 |
| Basic Circuits | 30 Material | Circuit production |
| Servomotor | 15 Material | Servomotors, advanced belts and docks |
| Mining Drones | 15 Material | Mining Drone Bay |
| Shipyard | 15 Material | Shipyard Core and side modules |
| Relic Analyzer | 15 Material | Relic research conversion |
The two five-to-fifteen-cost nodes are the best value in the game. Logistics I at 5 Material is the single most important purchase; without belts, every machine is a manual errand. Mining Drones at 15 Material turns the bay into an automatic ore supply. Shipyard at 15 Material opens the entire ship-design branch.
Basic Circuits at 30 Material is the first “real” cost. It is also mandatory for capacitors, detectors, and advanced modules. Buy it before you buy anything in tier 2.
Tier 2: the mid-game gate
| Technology | Cost | Unlocks |
|---|---|---|
| Computation Science | 50 Material | Computation science |
| Slipstream Drive | 200 Material + 200 Computation | Warp Fuel recipe |
| Logistics II | 100 Material + 100 Computation | Conveyor Belt Mk.2 |
| Detector Array | 100 Material + 100 Computation | Detector Array, tier 2 sensors |
Tier 2 is where the tree becomes a factory test. Computation Science at 50 Material is cheap, but Slipstream Drive at 200 + 200 requires two science lines running at once. If you rush it without a stable nickel supply, you will spend more time waiting for items than flying.
Slipstream Drive also requires a Shipyard and an Enrichment Chamber. Those are buildings, not technologies, and the Enrichment Chamber itself needs a research unlock. Plan the buildings before you queue the drive.
Detector Array is the exploration gate. It unlocks the sensor module that makes deep-space scanning practical. If you want to find new belts, buy it before Logistics II.
Tier 3: the three-science wall
| Technology | Cost | Unlocks |
|---|---|---|
| Quantum Science | 200 × 3 | Quantum science |
| Superalloy | 150 × 3 | Superalloy production |
| Coolant | 150 × 3 | Coolant production |
Tier 3 introduces three-science costs: Material, Computation, and Electromagnetic. Each node costs 200 of each, which means three separate production lines must be stable at the same time. This is the point where a single-lab research setup stops being enough.
Superalloy and Coolant are the inputs for advanced circuits and advanced plates. They are not optional side branches; they are the tier 4 economy. Build the production before you queue the research, or the unlock will sit unused.
Tier 4: the exploration and warp tier
| Technology | Cost | Unlocks |
|---|---|---|
| Astronomic Science | 500 × 4 | Astronomic science |
| Supercomputer | 500 × 4 | Supercomputer |
| Xenobiologic Science | 300 × 4 | Xenobiologic science |
| Interstellar Warp Drive | 200 × 4 | Interstellar travel |
Tier 4 is the long game. Four-science costs mean your station needs every lab type and a serious power budget. Interstellar Warp Drive is the gate to other star systems; it is the technology the whole factory has been building toward.
The 200 × 4 cost looks smaller than the 500 × 4 science nodes, but it requires the science nodes first. Do not queue the drive before you can produce all four science types.
Tier 5 and 6: the end of the demo's visible tree
| Technology | Cost | Unlocks |
|---|---|---|
| Biolattice | 200 × 4 | Biolattice production |
| Chitin Composite | 500 × 5 | Chitin Composite |
| Advanced Plate | 500 × 6 | Advanced Plate |
| Exosuit | 1000 × 6 | Exosuit |
These nodes are visible but effectively beyond the demo's content. They tell you the shape of the 1.0 economy: five- and six-science costs, biological materials, and personal equipment. Treat them as roadmap signals, not launch-day goals.
Special nodes and relic technology
Two special technologies sit outside the main tier ladder:
- Short-Range Teleporter — a station mobility module.
- Warp Fuel — 400 Material + 400 Computation, unlocked by Slipstream Drive, enables the fuel recipe.
The relic branch is separate. Relic Shards are converted by a Relic Analyzer into relic technology points, and those points unlock relic modules such as the Relic Capacitor, Small Relic Thruster, and Relic Synthesizer. Relic technology is not on the main tree; it is a parallel progression fed by exploration and combat.
What to rush, what to ignore
Rush:
- All tier 0 nodes.
- Logistics I.
- Mining Drones.
- Basic Circuits.
- Shipyard.
- Computation Science.
Delay:
- Logistics II until belts are the bottleneck.
- Detector Array until you have a stable second station.
- Tier 3 science until you can feed three labs.
- Relic technology until you can kill a relic defender.
Ignore until 1.0:
- Tier 5 and 6 nodes. They are visible, but the demo's content does not support them.
For what to do after the tree opens up, see the research guide→.
FAQ
How many technologies are in the demo? 97 total, with 43 locked. The visible tree runs from tier 0 to tier 6.
What is the most important tech? Logistics I. Belts are the difference between a factory and a chore.
What gates Slipstream Drive? 200 Material and 200 Computation, plus a Shipyard and an Enrichment Chamber.
What gates interstellar travel? Interstellar Warp Drive at 200 × 4, which requires the tier 4 science nodes first.
Is the relic tree separate? Yes. Relic points come from shards processed by a Relic Analyzer, not from the main science types.
For the fastest route through the early tiers, pair this page with the Main Sequence research guide→.
Official source: Main Sequence on Steam ↗ and the Steam news hub ↗.
Sources
- Main Sequence on Steam ↗ — technology and progression description.
- Steam news: Next Fest demo update ↗ — tech tree additions.
- Main Sequence on SteamDB ↗ — demo build reference.
- Mythwright ↗ — publisher.